Creating and managing a B2INST community#
B2INST communities group instrument records, users, curation responsibilities and community-specific publication requirements. Ordinary users must publish records within a community. This guide explains the complete graphical workflow: creating the community, completing its profile, choosing access and submission policies, adding longer information pages, and managing members and invitations.
Only a B2INST service administrator can create a community. The service administrator who creates it is automatically added as its Owner. After that, community work can be delegated according to the assigned role:
| Role | Main community permissions |
|---|---|
| Member | Participates in the community and can view restricted records when the community’s restricted-record policy permits it. |
| Curator | Curates submissions and can view restricted records. |
| Manager | Manages members up to the Manager role, curates submissions and can view restricted records. |
| Admin | Manages members up to the Admin role, curates submissions, and updates the community profile, privileges, submission policy and pages. |
| Owner | Has full administrative access, including assigning Owners, changing the identifier and deleting the community. |
The Admin role in this table is a role inside one community. It is different from a B2INST service administrator, who administers the service as a whole.
The community guides provide separate instructions for contributors, Curators, Managers, Admins, and Owners, plus detailed settings and schema-extension guidance.
Note: The screenshots illustrate a demonstration workflow. Community names, account details, host names, relative times and expiry countdowns shown in them are example values and will differ in another community or B2INST instance.
Workflow overview#
Set up a community in this order:
- Create the community with a name, unique identifier and initial visibility.
- Complete its profile and upload a profile picture.
- Configure community, member and restricted-record visibility.
- Decide who may submit records and who may publish without review.
- Write the About page and curation policy.
- Invite members, assign the minimum role they need and monitor the invitations.
- Ask each invited user to accept or decline their own invitation.
1. Create the community#
Sign in as a B2INST service administrator, select Communities in the header, and click New community. The same action is available from the + menu in the header. The creation form contains the following fields:
- Community name is the human-readable name displayed throughout B2INST. It is required and can contain up to 250 characters.
- Identifier is the community’s unique, URL-safe identifier. It is required, can
contain up to 100 characters and is converted to lower case. It becomes part of the
community URL, for example
/communities/demo_community. Choose a short, stable identifier because links, bookmarks and integrations can depend on it. -
Community visibility controls the initial access to the community:
- Public makes the community accessible to everyone and includes it in community search results.
- Restricted limits the community to users who have access.
The identifier must be unique. If B2INST reports that it is already in use, choose a different value. Click Create community when all required fields are complete. B2INST creates the community, makes the creator its Owner and opens the community’s Settings page.
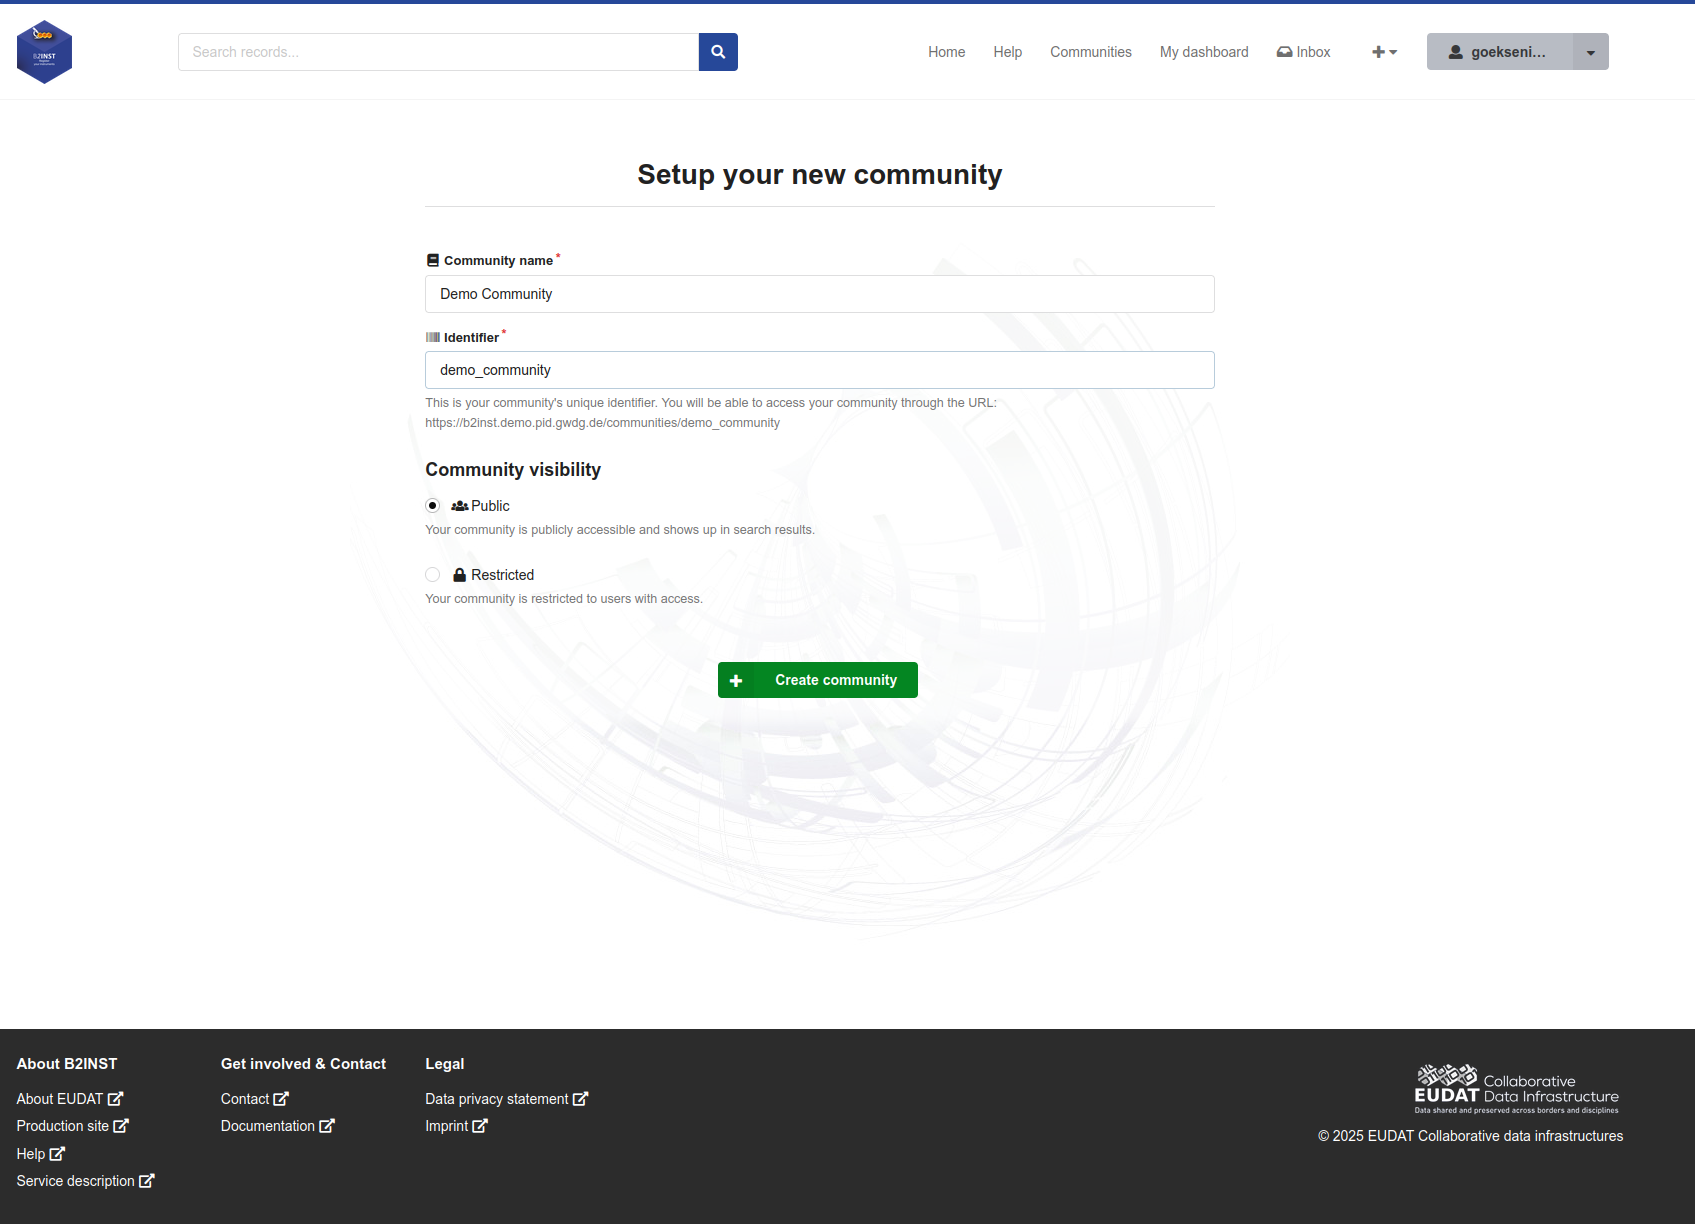
Figure 1. Enter the required community name and identifier, choose the initial visibility, and create the community.
Warning: Although an Owner can change the identifier later, doing so changes the community URL and can invalidate references to the old address. Treat the identifier as a persistent value.
2. Complete the community profile#
On the community page, select Manage community, open Settings, and select Profile. The name remains required; complete the other profile fields that apply to the community in the Basic information section:
- Name is the community’s displayed name. The limit is 250 characters.
- Short description is a plain, concise summary of the community’s purpose. The limit is 250 characters. Put longer background information on the About page instead.
- Type classifies the community. The standard B2INST vocabulary provides Organization, Event, Topic and Project; a deployment with a customized vocabulary may offer different choices.
- Website links to the community’s external website. Enter a complete, valid URL,
including the protocol such as
https://. - Organizations associates one or more organizations with the community. Search the affiliation vocabulary by organization name and select a result, or add a custom organization when it is not available in the suggestions.
- Profile picture is the community image shown in B2INST. Upload a JPEG or PNG file smaller than 1 MB.
Click Save to apply changes made in the profile form. The picture uploader is a separate control and uploads the selected picture directly.
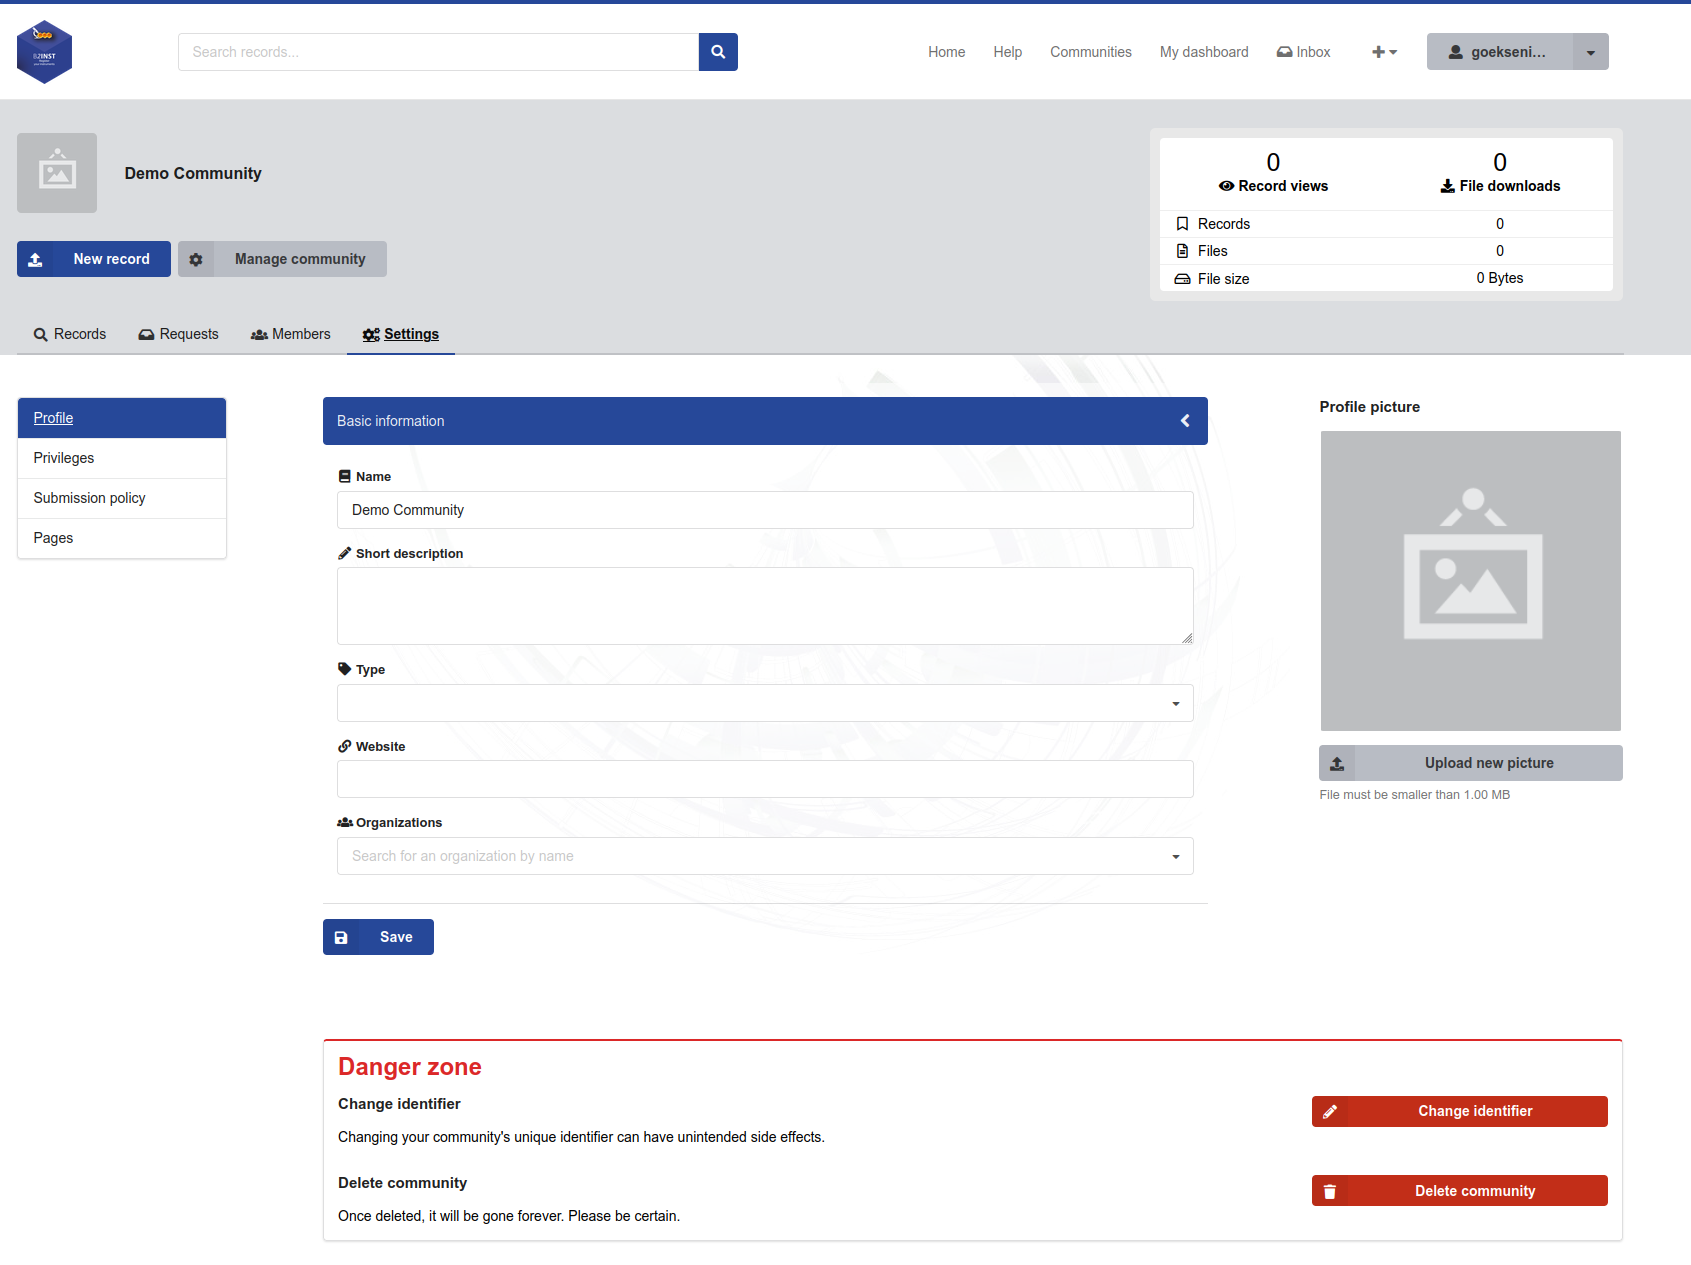
Figure 2. Complete the community’s basic information and profile picture under Settings > Profile.
Owner-only danger zone#
The bottom of the Profile page contains two high-impact actions that are available to Owners:
- Change identifier assigns a new unique identifier and therefore a new community URL. Review documentation, bookmarks and API integrations before using it.
- Delete community starts the permanent deletion workflow. Use it only after confirming the effect on the community, its membership and its records.
An Admin can update the normal profile fields, but only an Owner can change the identifier or delete the community.
3. Configure privileges and visibility#
Open Settings > Privileges. The three groups on this page control different things; changing one does not automatically make the others more or less visible.
Community visibility#
- Public: anyone can access the community and it appears in search results.
- Restricted: only users with access can open the community.
This is the same choice made during creation and can be changed here later.
Members visibility#
- Public: the Members tab is publicly available. Members whose own visibility is Public can be seen by anyone; members whose visibility is Hidden are visible only to other community members.
- Members-only: only members of the community can see its members.
- Hidden: the interface offers this option to restrict membership-list visibility, but the current implementation does not consistently enforce an administrators-only list. See the membership visibility limitations before relying on it to conceal memberships.
Community-level member visibility and an individual member’s Public or Hidden setting work together. They do not control access to records.
Restricted records policy#
- All community members gives Members, Curators, Managers, Admins and Owners access to restricted records and files in the community.
- Community curators, managers, and admins only limits access to roles with at least Curator permission, as well as the owner of the record. Community Owners also have this access.
Click Save after choosing all three policies. A newly created community initially uses Public community visibility, Public members visibility, and the Curator-or-higher restricted-record policy illustrated below.
For records in several communities, read the restricted-record policy limitations. Search and individual record access do not consistently combine different community policies in the same way.
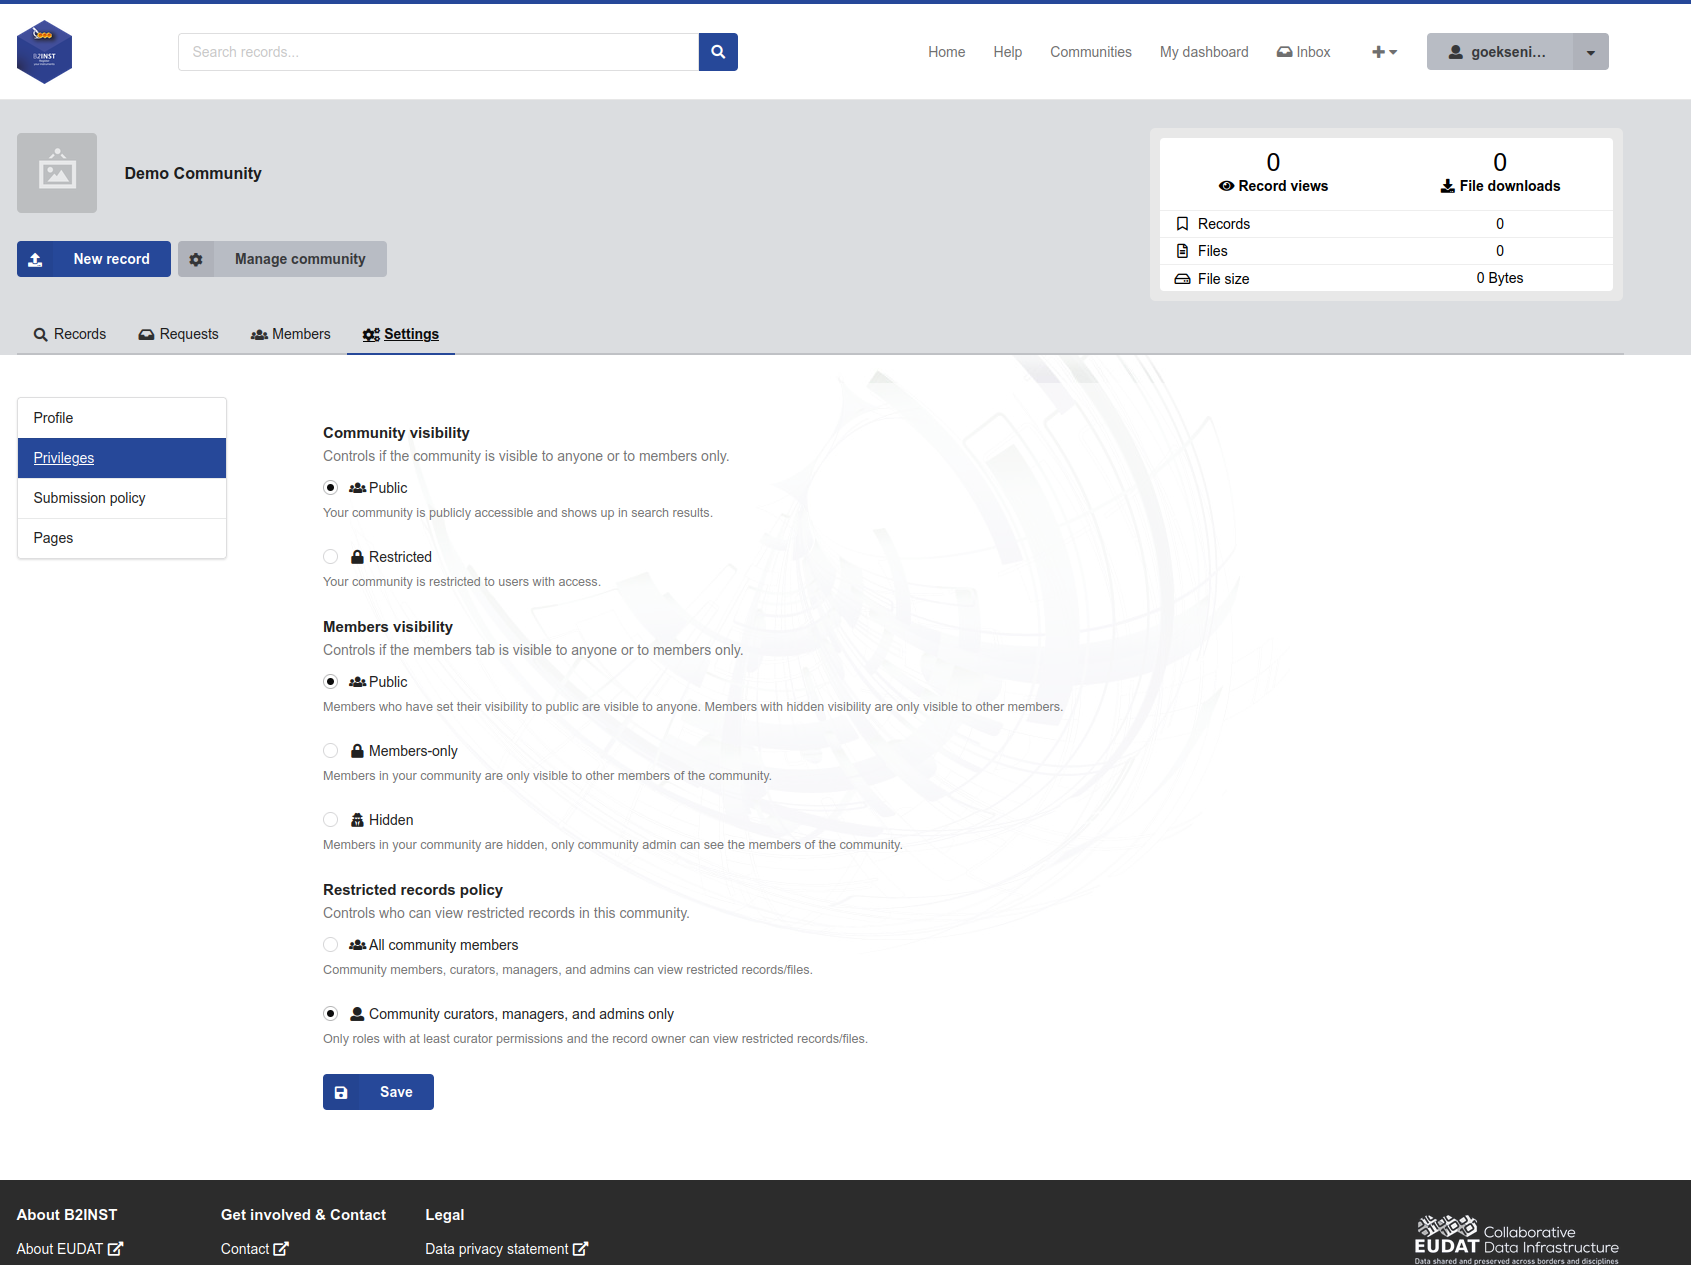
Figure 3. Configure community visibility, membership-list visibility and access to restricted records independently.
Note: B2INST does not currently expose a user-initiated request-to-join workflow. Membership is therefore managed by adding enabled groups or by inviting users.
4. Configure the submission policy#
Open Settings > Submission policy. This page answers two separate questions:
- Who is allowed to submit a record to this community?
- Which submitters may publish directly without a community review?
Review policy#
- Review all submissions requires community review for every submission.
- Allow curators, managers and owners to publish without review keeps review as the normal workflow, but lets community roles with curation permission publish directly. In B2INST, Admins also have curation permission.
- Allow all members to publish without review lets every community member publish directly; submissions from non-members still require review when they are allowed.
- Allow everyone to publish without review lets any authenticated user who may submit to the community publish directly.
Records submission policy#
- Open allows all authenticated users to submit. If the community itself is Restricted, only its members can submit even when this option is selected.
- Closed allows only community members to submit.
For example, combining Open with Review all submissions accepts proposals from any authenticated user but sends every proposal through community review. Combining Closed with Review all submissions limits both submission and the subsequent review workflow to community members.
Click Save after selecting one option in each group. New communities initially use Review all submissions and an Open records submission policy.
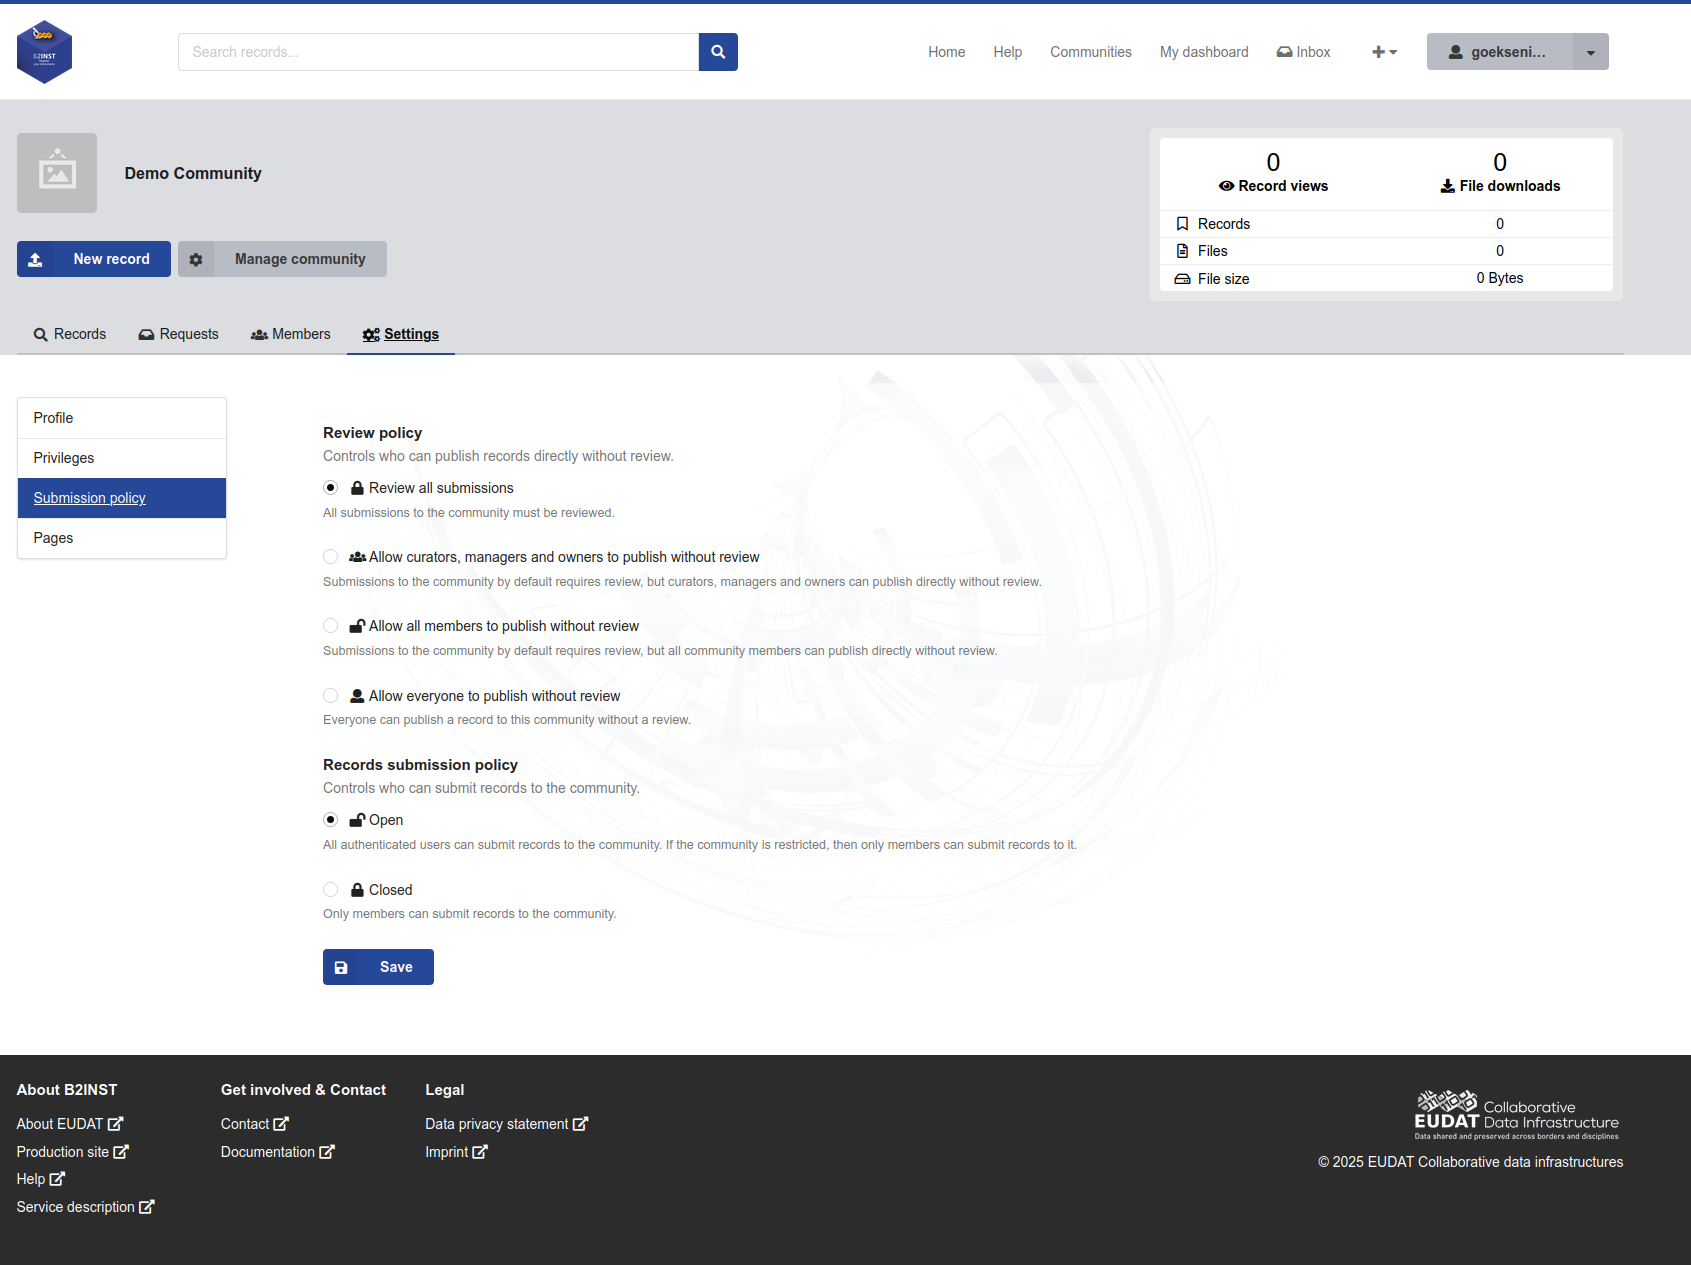
Figure 4. Set the direct-publication review policy separately from the record submission policy.
5. Add the community pages#
The Short description must remain concise. Use Settings > Pages for the detailed information users and submitters need:
- Curation policy should explain the scope of accepted records, metadata or file requirements, quality criteria, the review process and any community-specific conditions.
- About page should provide the longer community description, background, instructions, contacts and useful links that do not fit in the Short description.
Both fields use a rich-text editor with paragraph styles, emphasis, links, quotations, tables, lists, indentation and undo/redo controls. Each page can contain up to 50,000 characters. The two blue headings are collapsible; expand the section that you want to edit, then click Save to publish the changes. B2INST adds the corresponding About or Curation policy link to the public community navigation after that page has content.
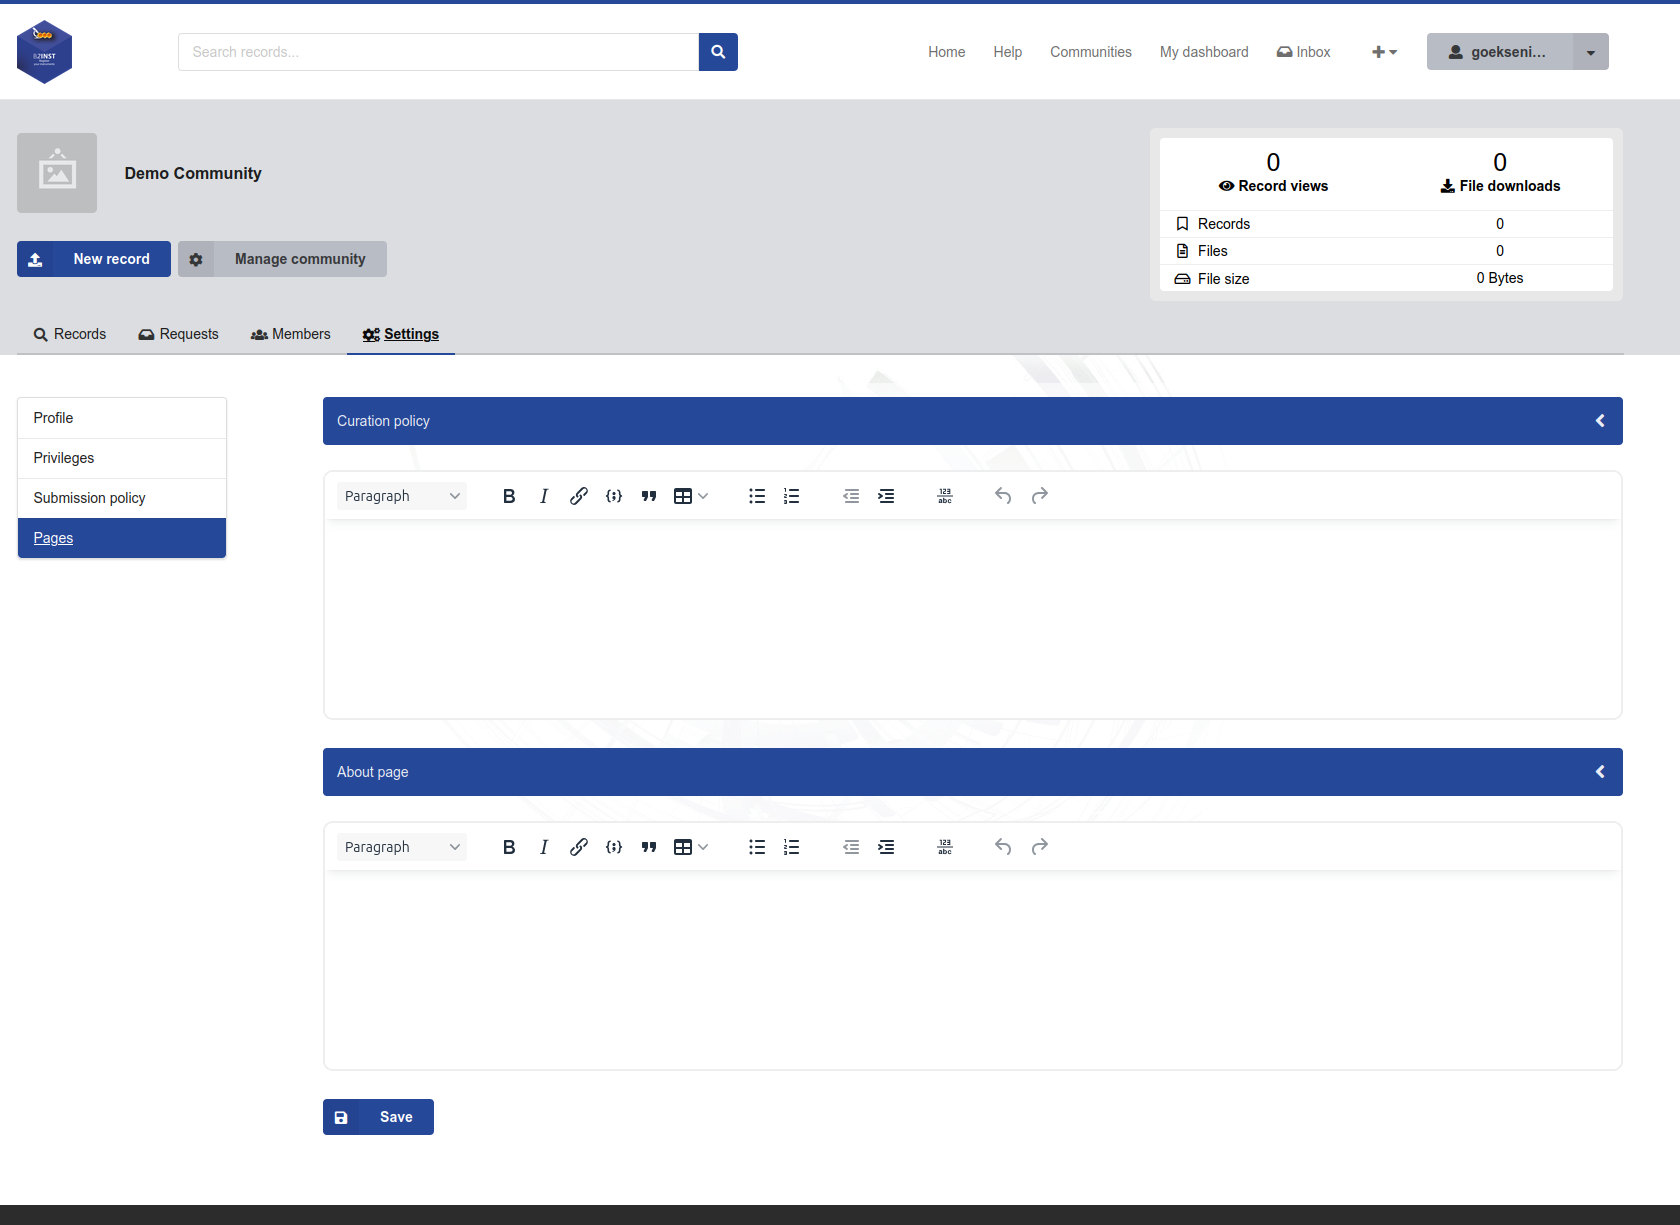
Figure 5. Add the detailed curation policy and About page with the rich-text editors.
6. Manage members and roles#
Open the community’s Members tab. The Members view provides:
- a search box for finding a member;
- Role and Visibility filters;
- name sorting and result pagination;
- selection checkboxes for bulk role, visibility or removal actions;
- the date each membership began;
- each member’s Public or Hidden visibility and current role; and
- Invite, Remove and Leave actions when the current user’s permissions allow them.
The creator appears as the first Owner. New invited memberships start as Hidden. Each user can make their own membership Public or Hidden and can leave through Leave. A Manager can protect another member’s privacy by making that membership Hidden, but cannot make it Public on the member’s behalf.
Managers, Admins and Owners can update or remove members within the roles that they are allowed to manage. They cannot change their own role, and B2INST requires at least one Owner to remain in the community. Assign the least privileged role that lets the person perform their task:
- use Member for ordinary participation;
- use Curator for reviewing and curating records;
- use Manager for curation plus day-to-day membership management;
- use Admin when the person must also change community settings; and
- reserve Owner for people who need full control, including identifier and deletion actions.
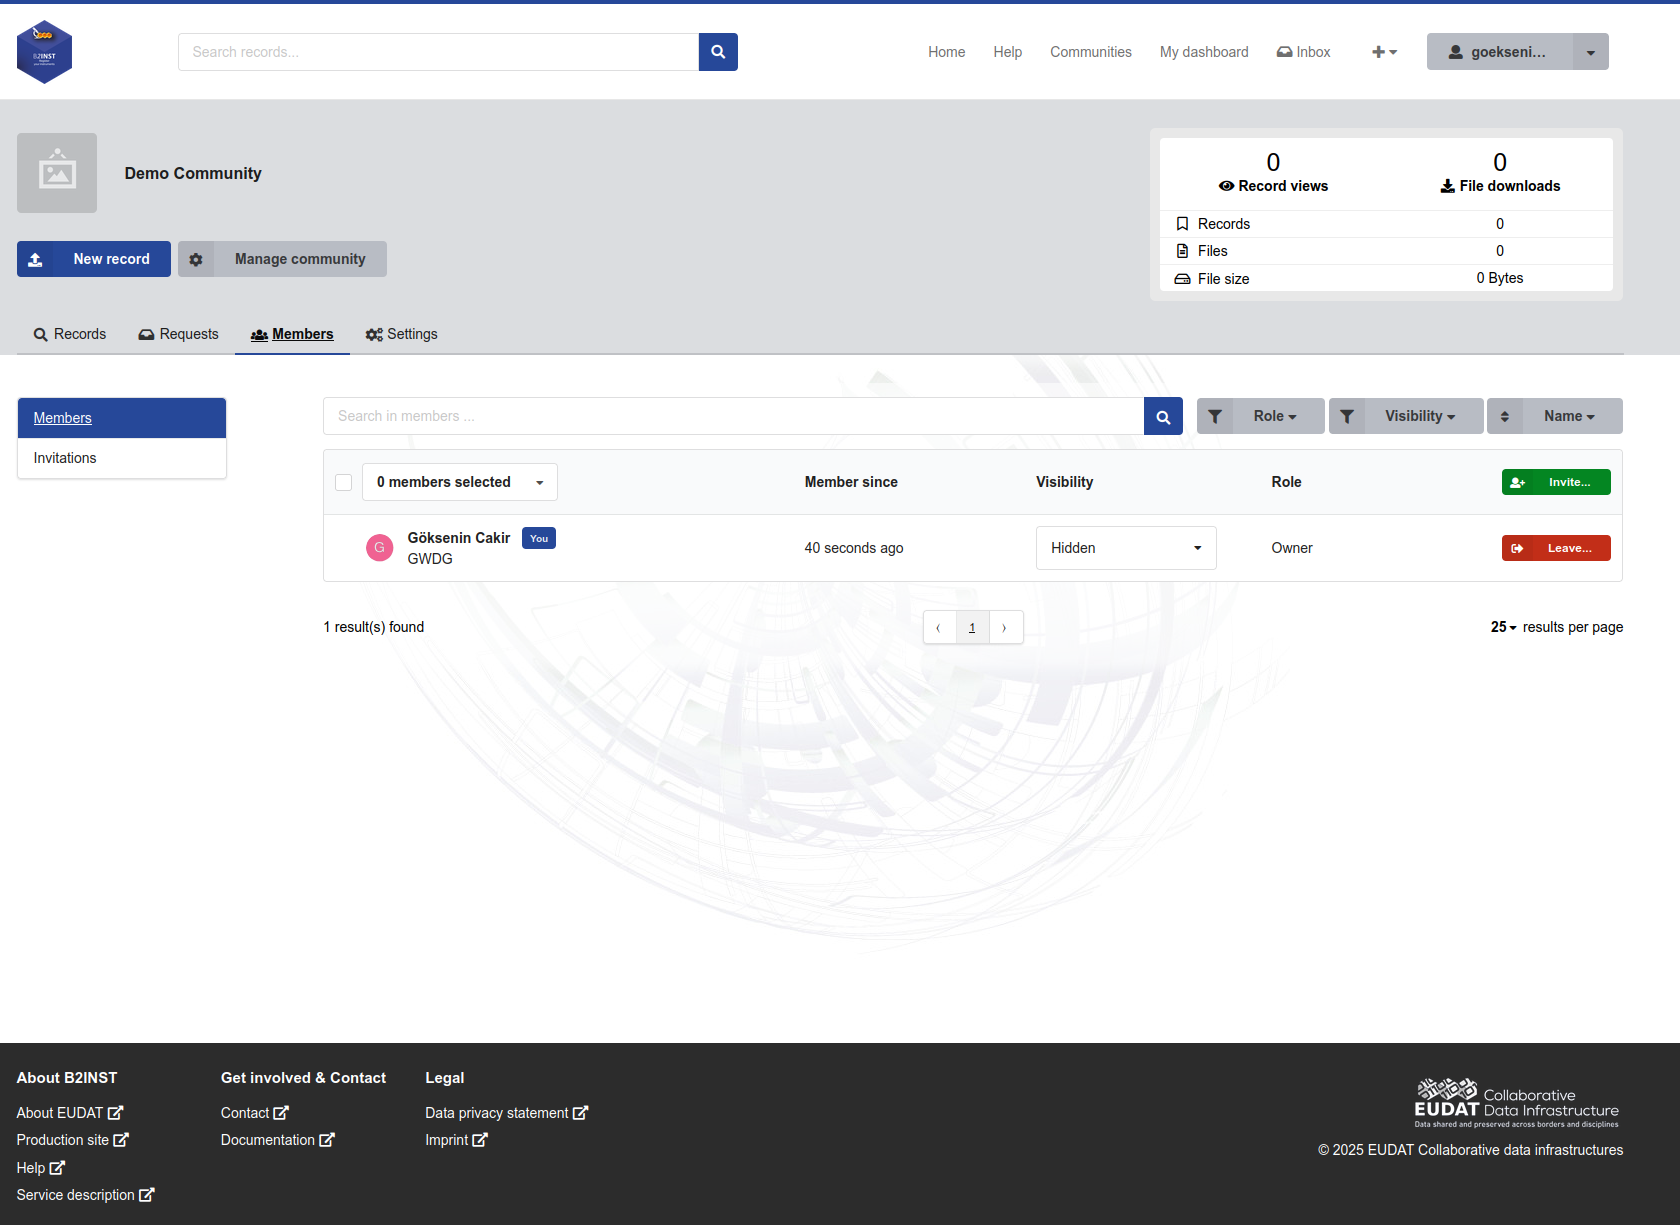
Figure 6. The initial Members list contains the service administrator who created the community as its Owner.
7. Invite community members#
Open the invitations list#
Select Members > Invitations. Use Open for active invitations and Closed for invitations that have been accepted, declined, cancelled or expired. The view supports search, Role and Status filters, name sorting and pagination. Click Invite to start a new invitation.
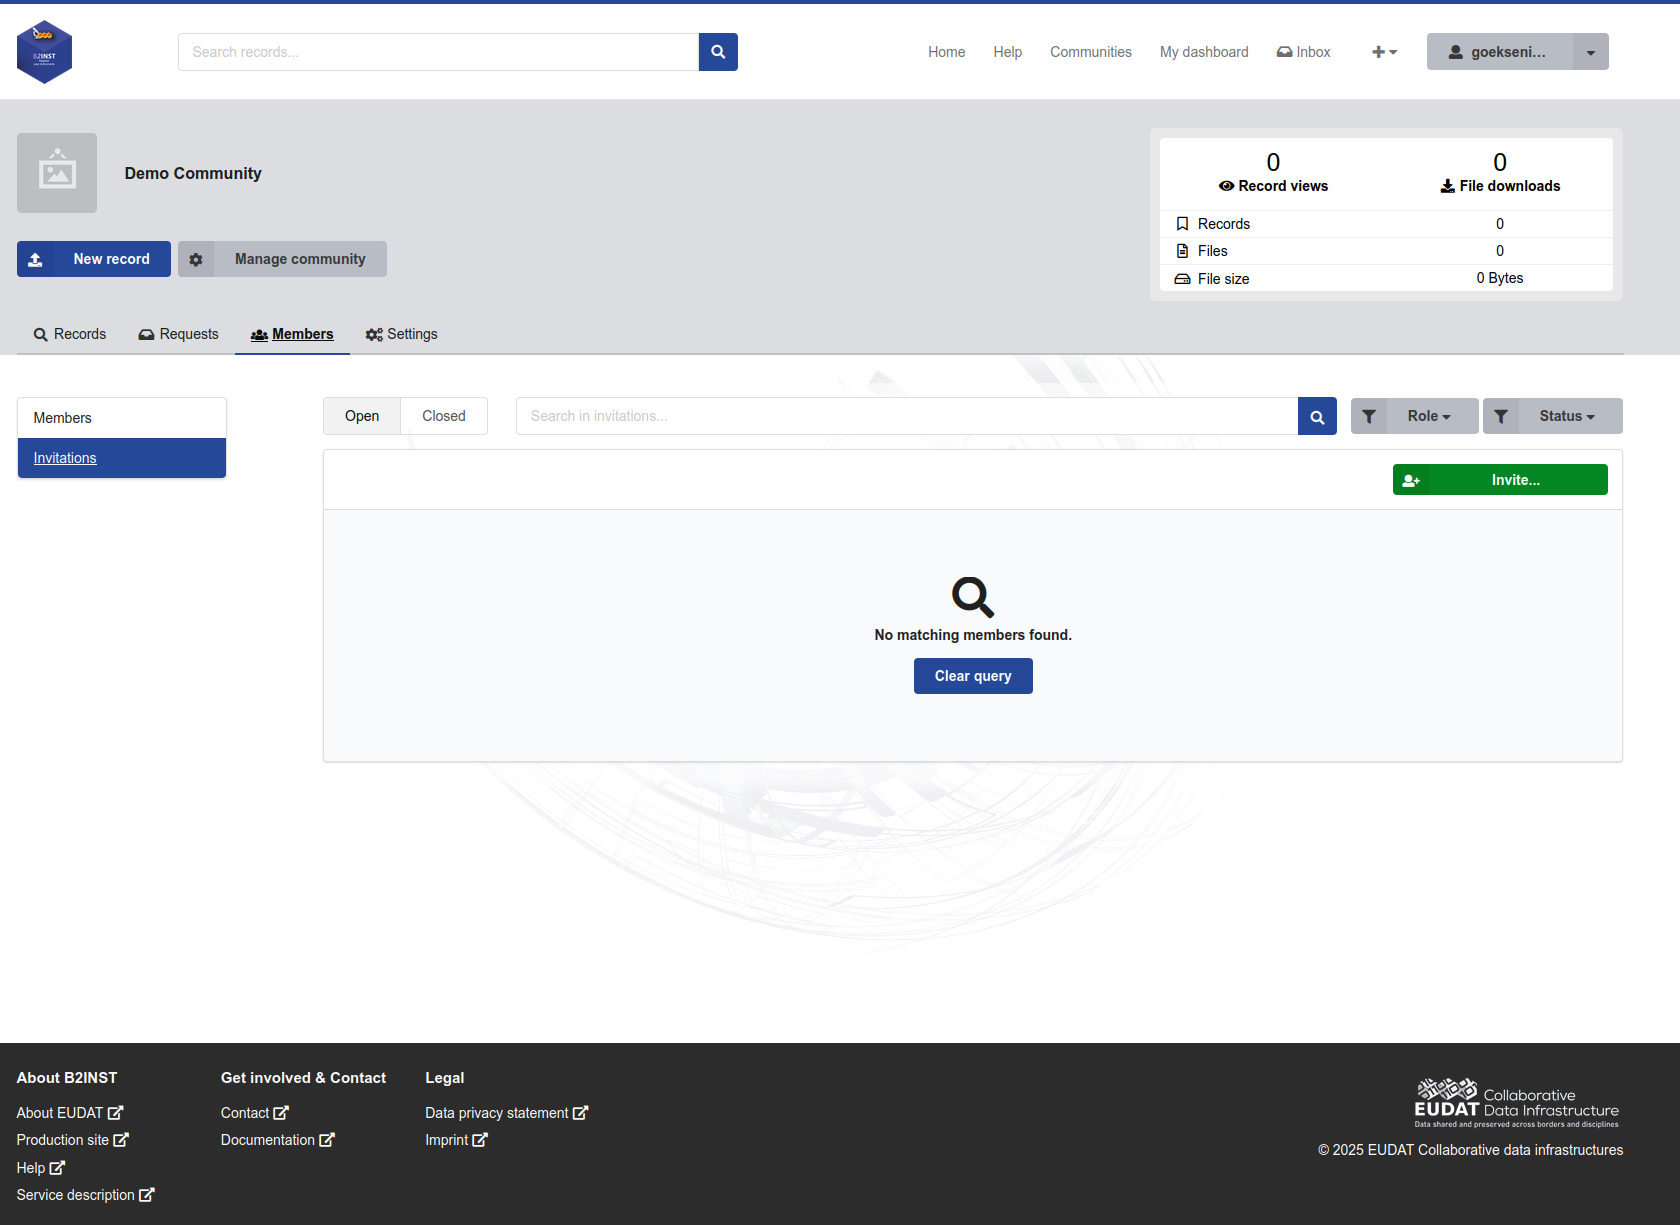
Figure 7. The Invitations tab lists and filters community invitations and starts new ones.
Select recipients and a role#
The invitation window offers three recipient methods:
- People searches registered B2INST users by email address, full name or username. Only accounts with a public profile appear in these results.
- Groups adds an enabled user group directly to the community when group management is appropriate. A group does not receive or accept an invitation.
- Email Invite accepts up to 100 valid email addresses separated by semicolons. It can find a registered account without exposing whether the address exists. It does not create a B2INST account for an unknown address, and the sender receives no account- existence feedback.
The screenshots below illustrate the People workflow. Search for a user and select the matching result. A user who is already a member or already has a pending invitation cannot be selected again.
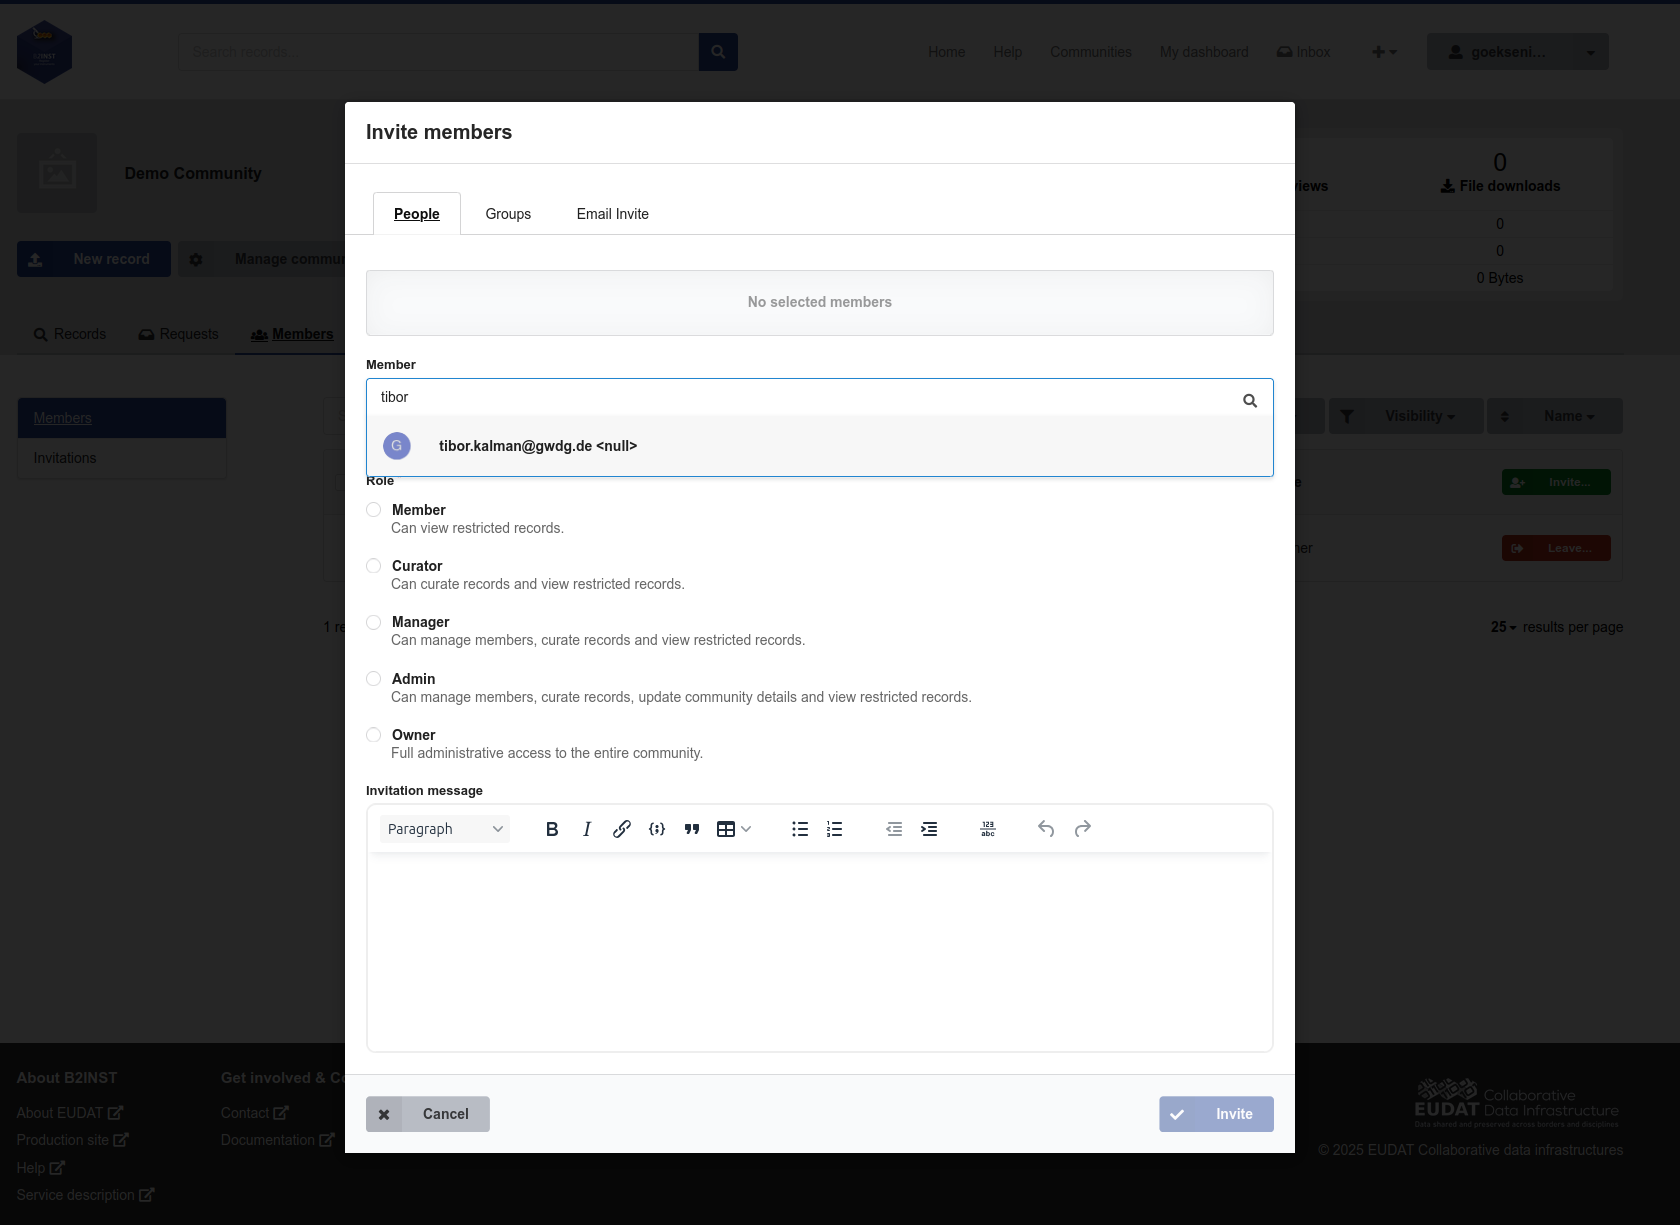
Figure 8. Search for a registered user in the People tab of the Invite members window.
Select the role that the user will receive. The invitation form describes the five role levels, from Member through Owner; the capabilities are summarized at the start of this guide. The role is required. An optional rich-text Invitation message can explain why the person is being invited and what is expected of them. Confirm the selected recipients and click Invite.
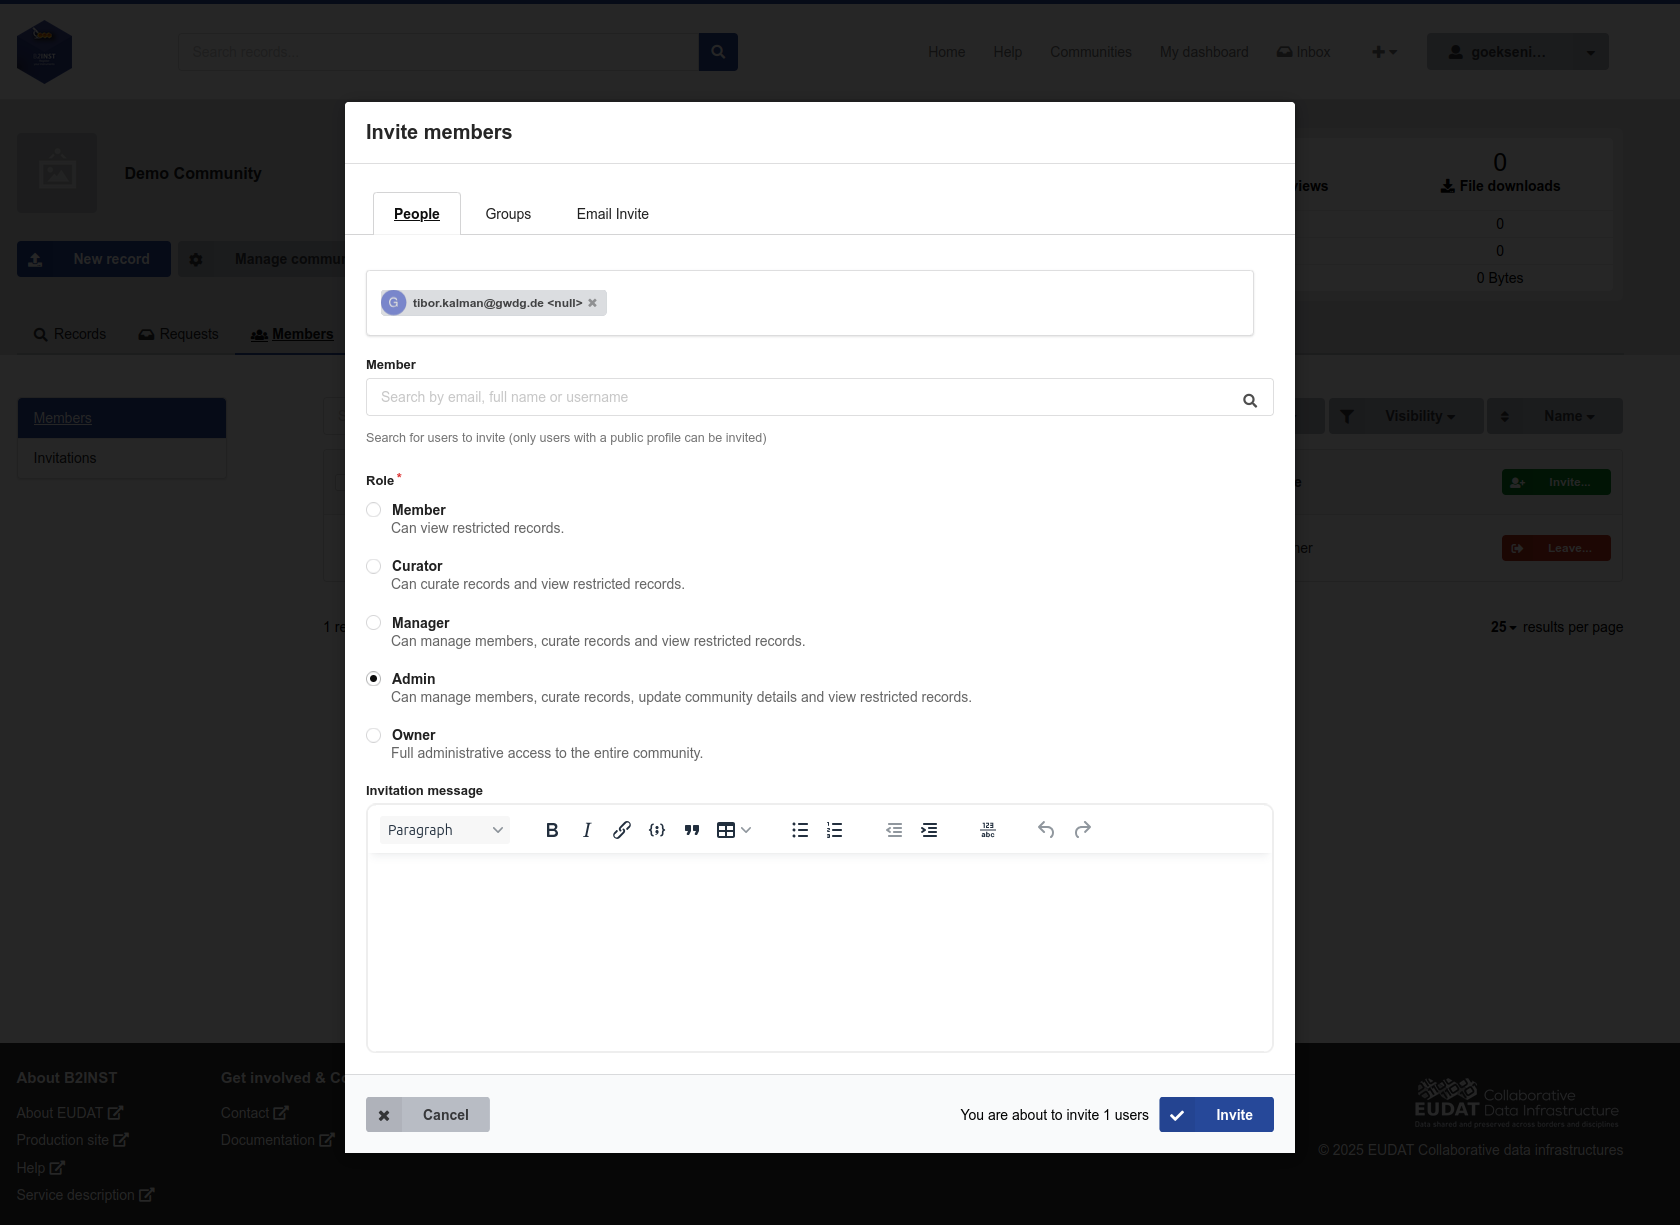
Figure 9. After selecting the user and required role, optionally add a message and send the invitation.
Monitor or change a pending invitation#
The new invitation appears under Open with the recipient, Submitted status, expiry date and proposed role. Invitations expire 30 days after they are sent; the remaining time is displayed as a countdown. An authorized community Manager, Admin or Owner can change the proposed role while the invitation is open. Select the linked user name or email address to open the request details.
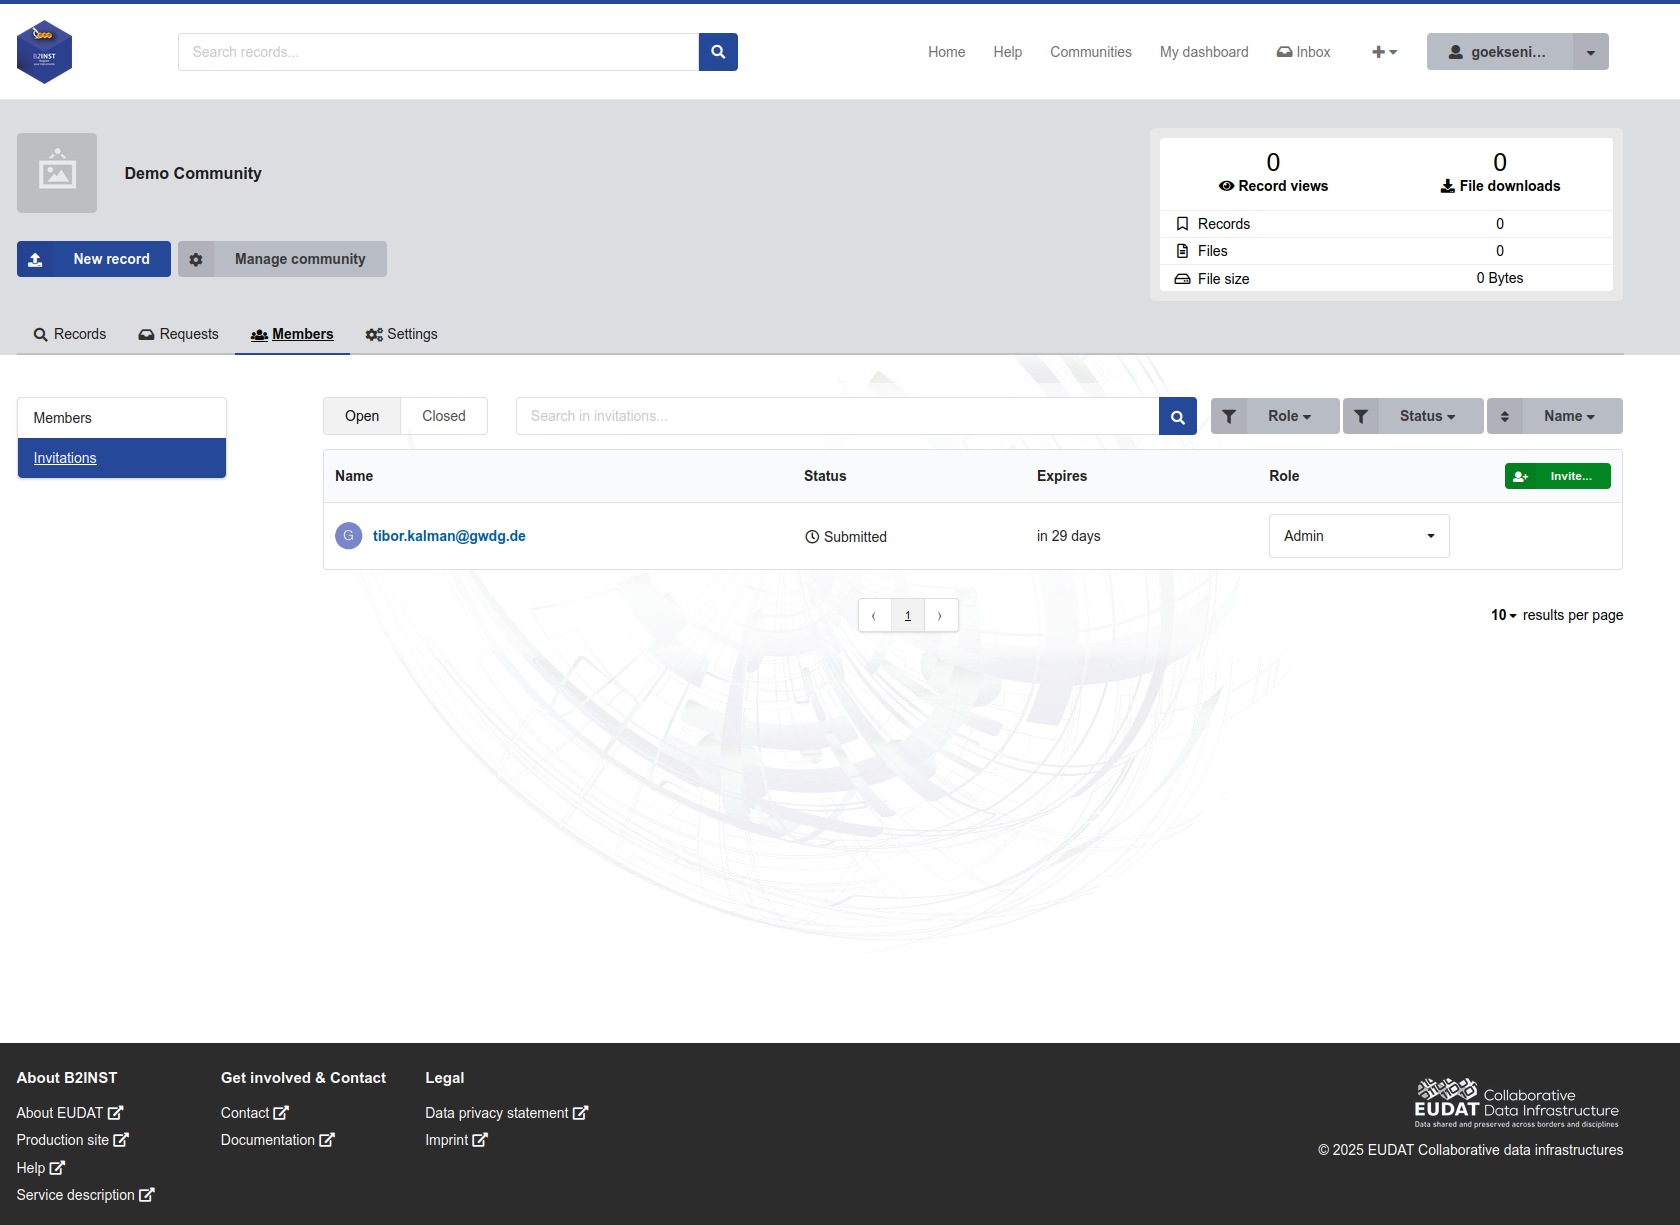
Figure 10. An open invitation shows its status, expiry and proposed community role.
Important: The community side sends, monitors and, if necessary, cancels an invitation. The invited user is the receiver and must accept or decline it. A community or service administrator should not accept the invitation on the user’s behalf.
Accept or decline the invitation#
The invited user follows the B2INST notification or opens the request from their Inbox, then reviews:
- the community that created the invitation;
- the role they will receive;
- the creator and receiver;
- the request type and current status; and
- when the invitation was created and when it expires.
The request page also has a discussion field and Comment action. The available request actions depend on the viewer: the invited user can Accept or Decline, while the community side can Cancel an invitation that is no longer needed.
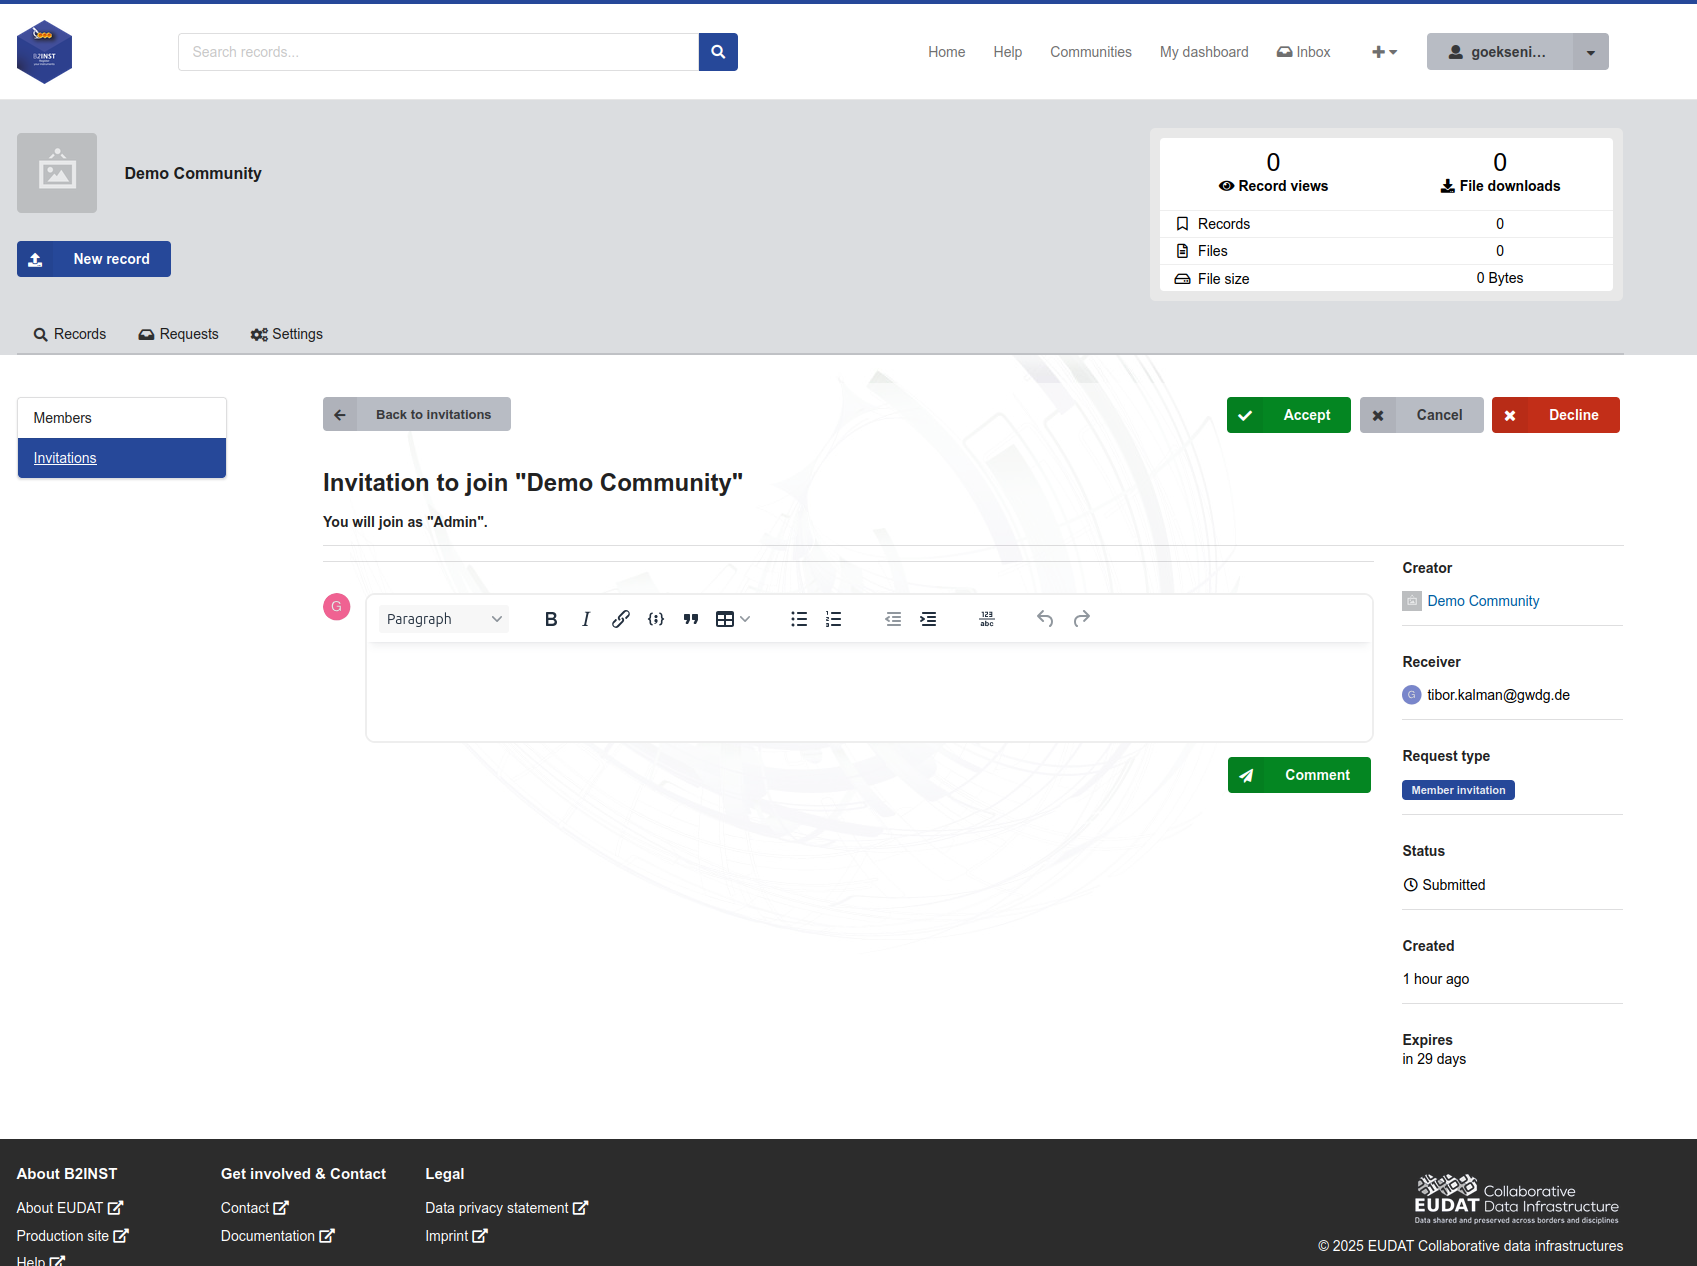
Figure 11. The invitation receiver reviews the community, assigned role and request details before accepting or declining.
Selecting Accept or Decline opens a confirmation window. The invited user may add an optional comment or leave the field empty, then confirms the chosen action. The Cancel button inside this confirmation window only closes the window without performing the action.
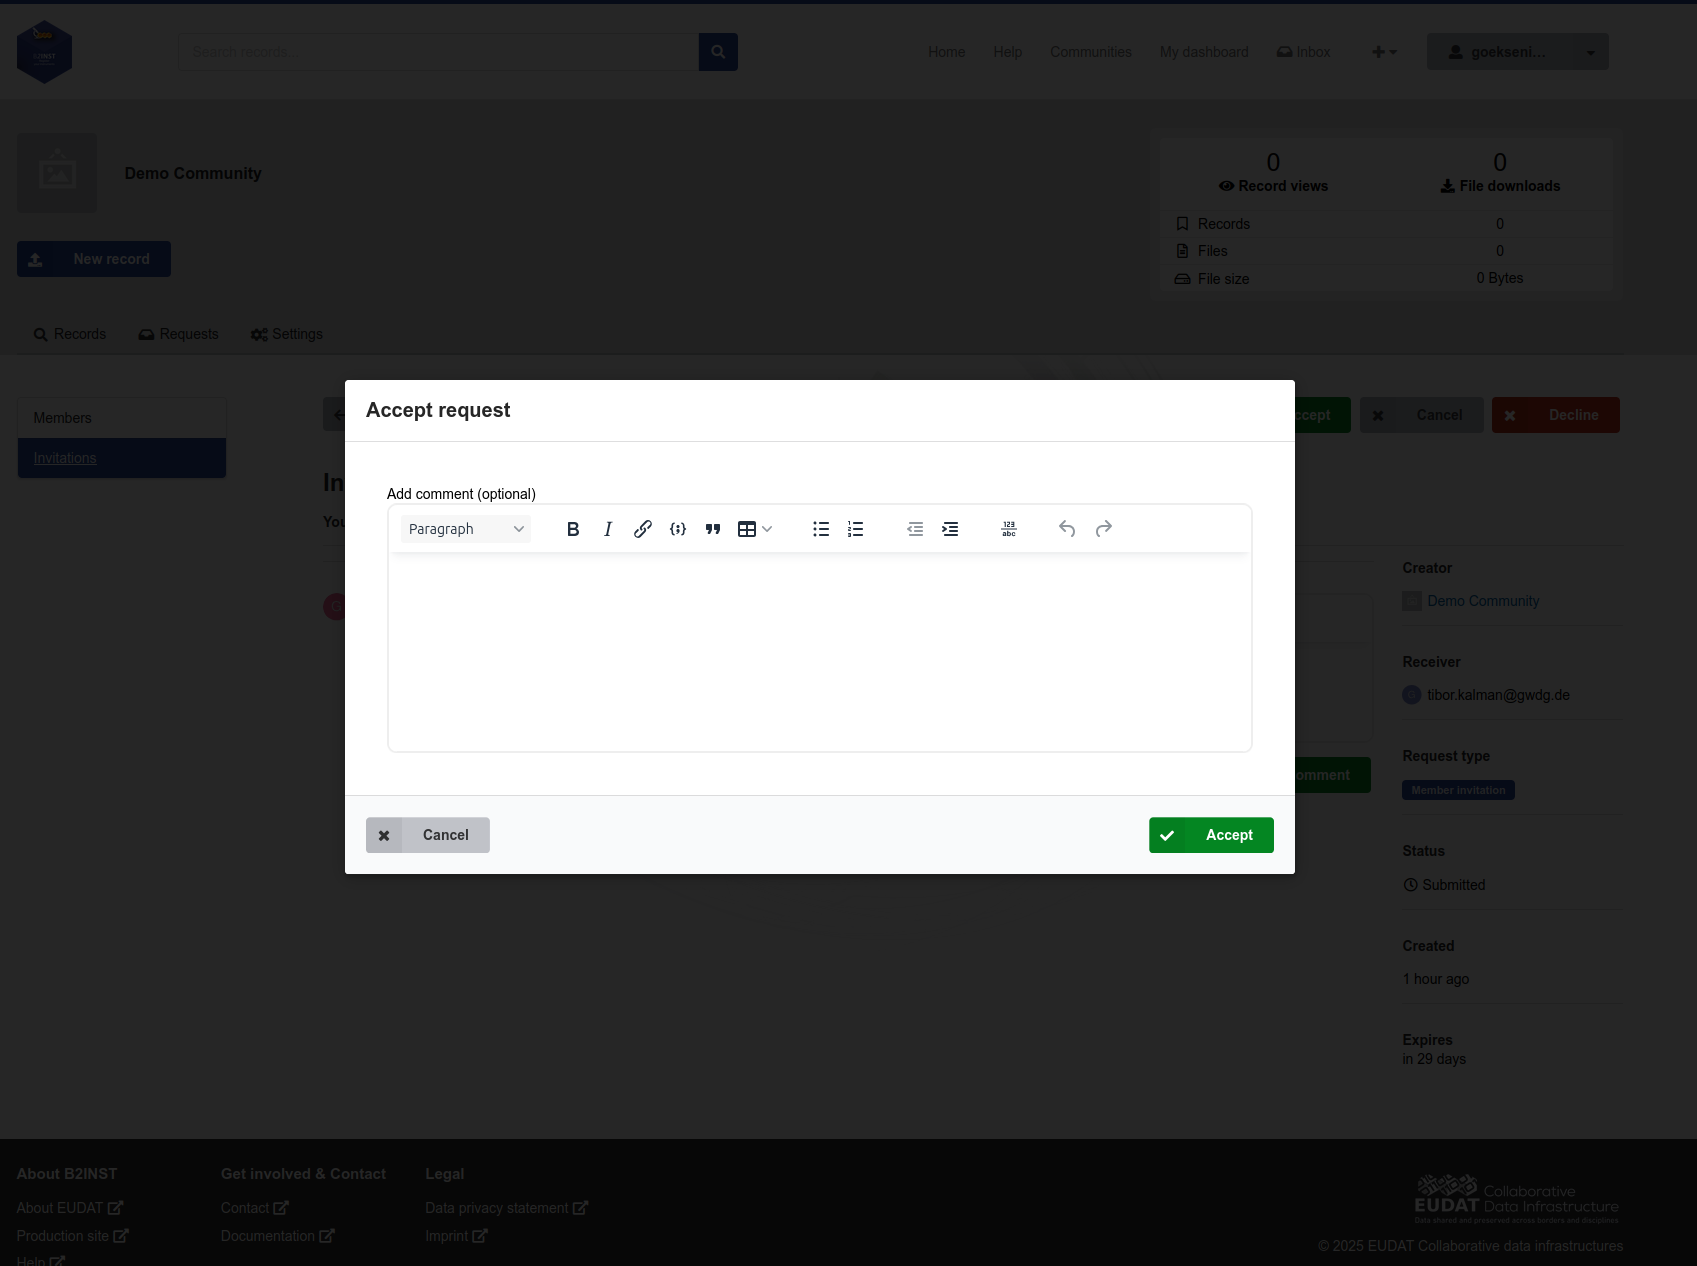
Figure 12. The invited user can accept with or without an optional comment; declining offers the same optional-comment step.
After acceptance, the user becomes an active member and appears in the Members list with the assigned role. A Manager, Admin or Owner can subsequently change that role or remove the member within their own management permissions. A declined, cancelled or expired invitation does not create active membership and is retained in the Closed invitation history.
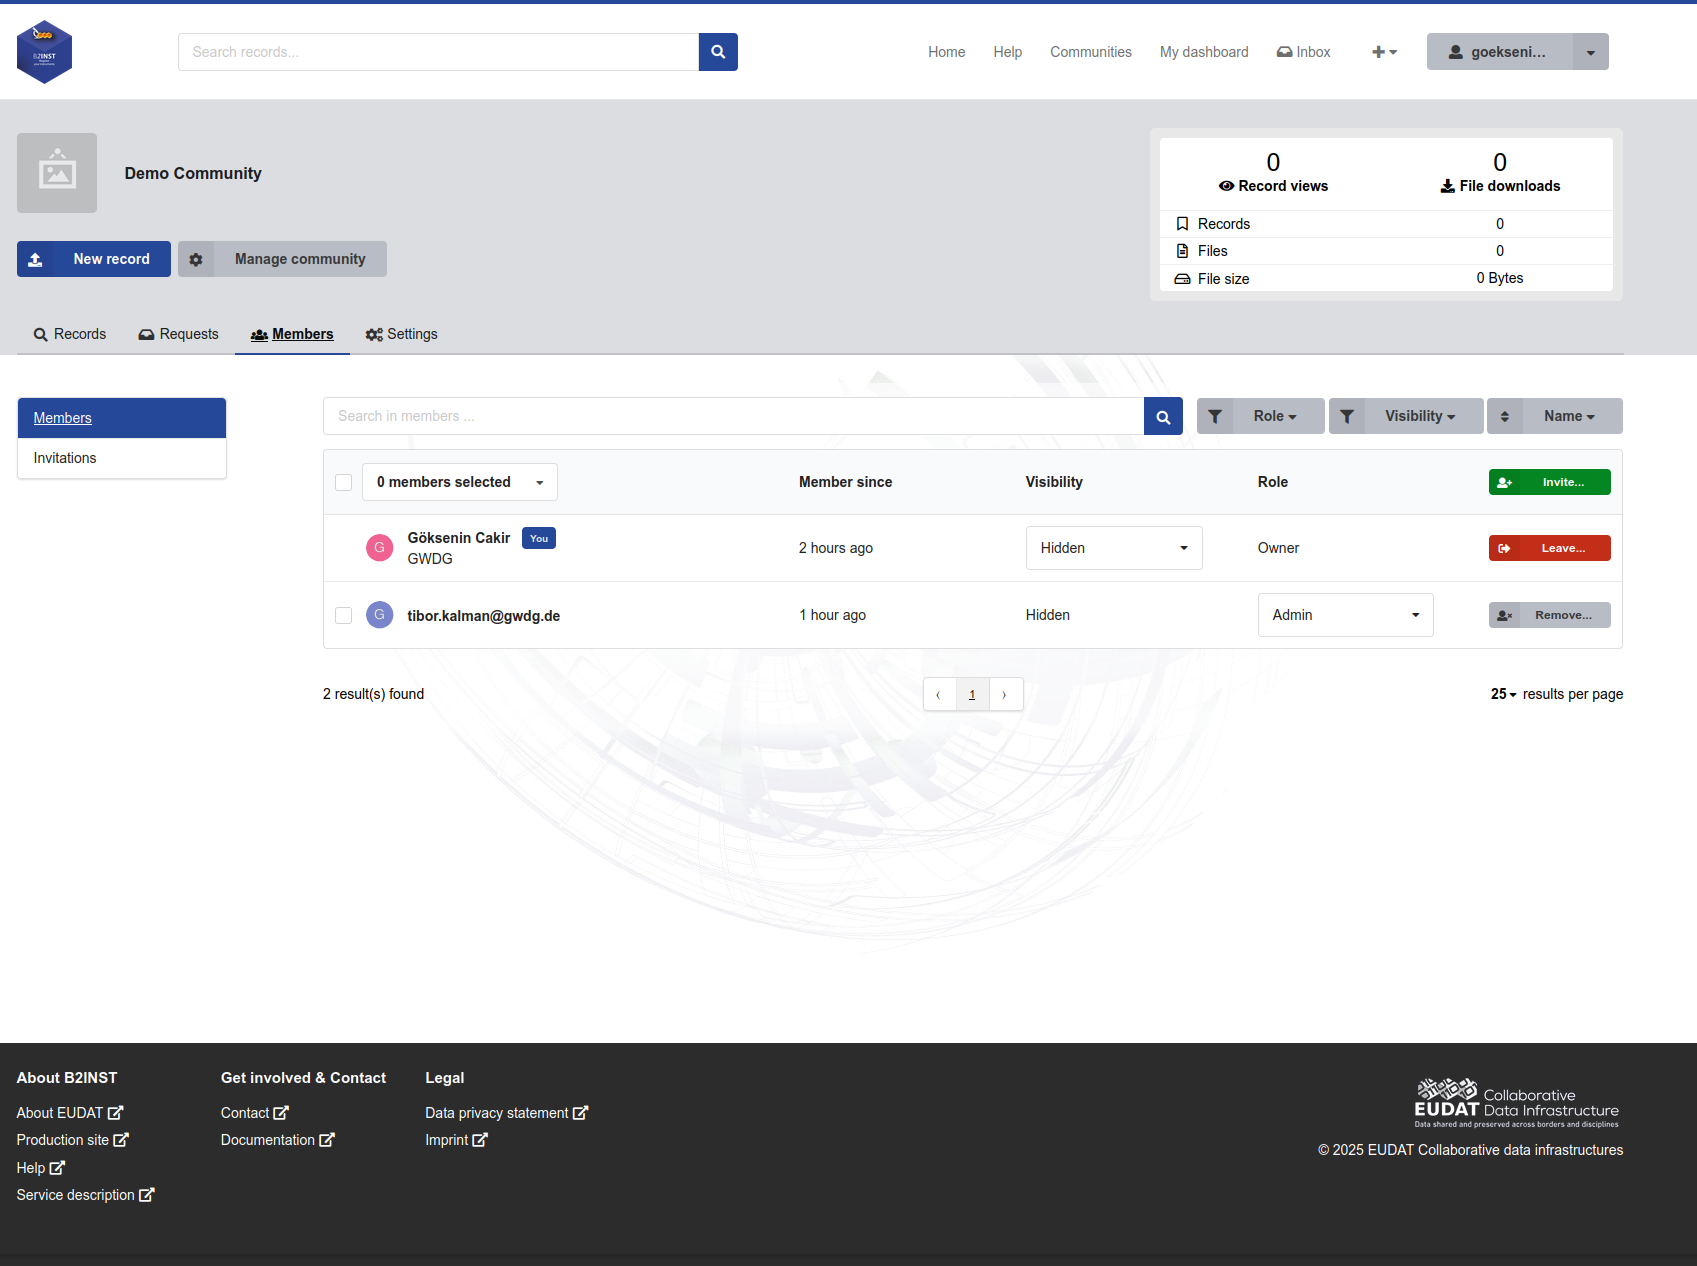
Figure 13. The accepted user appears as an active member; authorized community administrators can change the role or remove the membership.
Completion checklist#
Before announcing the community to users, verify that:
- the name, stable identifier, type, short description, website, organizations and profile picture are correct;
- community visibility, membership visibility and restricted-record access reflect the intended privacy model;
- the submission and review policies implement the intended curation workflow;
- the About page and curation policy explain the community clearly;
- at least one appropriate administrator can maintain the community, without granting unnecessary Owner access;
- a test invitation can be received and accepted by the intended user; and
- the resulting member role and visibility are correct in the Members list.
Last update: 04.10.2026
Last review : 06.10.2026